Table of Contents

(remove this paragraph once the translation is finished)
Preparing a station without a Jack audiosystem
A prerequisite is a computer with a working operating system Ubuntu 16.04.LTS. Computer’s architecture can be either ARM or Intel. Both cases are identical to the way of connecting further hardware such as I²C.
$ sudo apt-get install build-essential cmake libusb-dev i2c-tools python-smbus cython libudev-dev python-setuptools python-numpy python-cheetah libboost-all-dev libfftw3-dev libcfitsio-dev libjack-jackd2-dev autossh gpsd-clients buffer pv ntp libvolk1-dev
I2C
$ sudo easy_install hidapi
$ cd ~/repos
$ git clone https://github.com/MLAB-project/pymlab
$ cd pymlab
$ sudo python setup.py develop
In case of Odroid-C2, I²C has to be made work by a correct entry into /etc/modules, as described at MLAB wiki.
station-supervisor
$ cd ~/repos
$ git clone https://github.com/MLAB-project/python-mlab-utils.git
$ cd python-mlab-utils
$ sudo python setup.py install
$ cd ~/repos
$ git clone https://github.com/MLAB-project/station-supervisor.git
SDR-Widget
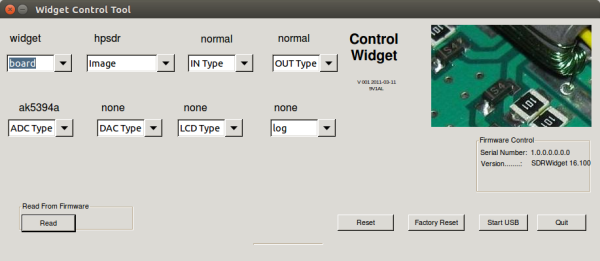
For software to function properly, it is necessary that the sdr-widget hardware will be configured according to the following screenshot and VID and PID have to be set to fffe:0007.
$ cd ~/repos
$ git clone https://github.com/MLAB-project/signal-piping-tools.git
$ cd signal-piping-tools
$ make
Nastavení uživatelských práv
The default user rights setting do not enable a direct communication with USB devices via libusb. User rights can be altered by creating a proper file in /etc/udev/rules.d/ , as follows:
$ sudo su
# curl https://raw.githubusercontent.com/borgestrand/sdr-widget/d4cc8700429bc1acef826f46d8e40df04e1f6e1c/etc/sdr-widget.rules > /etc/udev/rules.d/sdr-widget.rules
# exit
Now it is necessary to unplug and plug the USB device again. Then you can use libusb even from a standard user account.
radio-observer
2015-08-13: Properties of radio-observer not yet included in a main branch of source code are assumed. Therefore, after git clone it is necessary to run git checkout feat/raw.
$ cd ~/repos
$ git clone https://github.com/MLAB-project/radio-observer.git
$ cd radio-observer/
$ git submodule init
$ git submodule update
$ cd cppapp
$ make
$ cd ..
$ make
Setting station’s time
Change the system time zone to UT.
sudo dpkg-reconfigure tzdata
Sometimes it is also necessary to generate a local setting, e.g.:
sudo locale-gen cs_CZ.UTF-8
Time synchronisation NTPd
Time synchronisation requires a daemon that handles the GPS socket for NTP (??který se stará o GPS povolit socket pro NTP).
It can be done in /etc/ntp.conf file
server 127.127.28.0 minpoll 4 prefer
fudge 127.127.28.0 time1 0.0 refid GPS
GPSd has to be at the sea time set to give data even without connected clients. It can be done during installation.
sudo dpkg-reconfigure gpsd
Start gpsd automatically on boot? Yes
Device the GPS receiver is attached to: /dev/ttyACM0
Should gpsd handle attached USB GPS receivers automatically? Yes
Options to gpsd: -b -n
Testing the synchronisation can be done following these instructions.
Directories for saving the records and station’s configuration
Records and station’s settings are saved to ~/bolidozor.
mkdir -p ~/bolidozor/station/snapshots
mkdir -p ~/bolidozor/station/meteors
mkdir -p ~/bolidozor/station/data
cp ~/repos/radio-observer/Bolidozor.json ~/bolidozor/station/Bolidozor.json
The last command will copy a default configuration of radio-observeru to ~/bolidozor/station/Bolidozor.json, where a startup script awaits it. After copying, it is necessary to change a name of the station in this line. (The link contains a station named debug.)
It is recommended to write data to an SD card, which connects via ~/bolidozor, on a station’s computer. In such case, a content of the prepared ~/ionozor directory should be copied to SD card’s root. This approach is advantageous as it saves entries to an expensive eMMC card that the station’s computer boosts from. Compared to that, an SD card is much less expensive and its damage will not limit the basic diagnostics of a station.
Příprava SDkarty
A new SD card has to be formatted to F2FS file system. In order to do it, you have to install a support for F2FS file system into your OS by installing a f2fs-tools package.
sudo apt install f2fs-tools
Format the media using one of the standard methods of formatting
Connect the formatted SD card to ~/bolidozor directory and set its file rights so that other users than root will also be granted an access. Use the following commands (it is assumed that the formatted SD card is /dev/mmcblk1p1 device):
sudo mount -t f2fs /dev/mmcblk1p1 ~/bolidozor/
sudo chgrp -R odroid bolidozor
sudo chown -R odroid bolidozor
Next, when the card is mounted, create the following data folders:
mkdir -p ~/bolidozor/station/snapshots ~/bolidozor/station/data ~/bolidozor/station/meteors
Next it is necessary to initiate the station’s configuration. Usually, the easiest way is to ‘lend’ and adjust a configuration of some new or former station, for example:
cd ~/bolidozor/station/
wget http://space.astro.cz/bolidozor/svakov/SVAKOV-R12/Bolidozor.json
wget http://space.astro.cz/bolidozor/svakov/SVAKOV-R12/bus_config.py
Launching after startup
Because most stations are installed on Odroid computers, whose default user is called odroid, it is assumed that the user who runs the station software is also called odroid. Substitute the correct name for odroid if necessary.
It is also necessary to add to /etc/rc.local what has to be launched after startup. All stations should launch /home/odroid/repos/station-supervisor/start.sh - this will run the station’s software. Because the station’s software should run under odroid user, the whole command should look like as follows:
su odroid /home/odroid/repos/station-supervisor/start.sh
If the records on Odroid should be written on an SD card, before the start.sh a /home/odroid/repos/station-supervisor/mount-sd-card.sh should also be run - it will connect the card via /home/odroid/bolidozor.
The commands should be added to rc.local before exit 0, which will then remain at the end of the file.
An example of /etc/rc.local after adjustments:
#!/bin/sh -e
#
# rc.local
#
# This script is executed at the end of each multiuser runlevel.
# Make sure that the script will "exit 0" on success or any other
# value on error.
#
# In order to enable or disable this script just change the execution
# bits.
#
# By default this script does nothing.

/home/odroid/repos/station-supervisor/mount-sd-card.sh

su odroid /home/odroid/repos/station-supervisor/start.sh &

exit 0
Removing unnecessary system components
sudo apt-get remove blueman-applet

